Showing posts with label Crafts. Show all posts

Tuesday, August 21, 2012

Applique Pillow

 This summer I made an applique pillow for each of the boys.  They each picked out their own fabric and applique design.


 I used Heat N Bond to adhere the applique, and then then stitched around the design on my sewing machine.  Tutorial to follow! (Maybe)

Sunday, February 12, 2012

Fortune Cookie Tutorial

I made these candy filled fortune cookies for my son's class for Valentine's Day. I got the idea here but wanted to use patterned fabric instead of felt. This is how I did it.
For this Project you will need: 1 6"X6" piece of fabric for the outside, 1 6"X6" piece of fabric for the inside, a piece of Heat N Bond, a 5" piece of wire and a 6" diameter bowl for tracing.
After tracing your bowl onto the Heat N Bond, iron it on the wrong side of your lining fabric and cut out.
Peel the backing paper off, and center the wire in the middle of the circle.
Iron your outside fabric to the lining circle, and cut it even with the lining.
Fold the circle as shown.
Fill with candies and a message, and fold to look like a fortune cookie.

Sunday, December 25, 2011

Scalloped Flannel Blanket Tutorial


For this blanket you will need:
2 yards of flannel (1 yard for each side of the blanket)
1 yard of batting
Matching thread
a bowl or cup to trace around
1 yard piece of butcher or wrapping paper
Fabric marker (one that will wash out in the laundry)


Step 1-

Make a pattern by cutting your butcher paper into a 34x34 inch square. Use your bowl or cup to make an even scalloped pattern around your square. The size of the bowl depends on your own taste. Mine was 6 inches in diameter. (I have seen similar tutorials where they just trace around the bowl directly on the fabric, but I like making a pattern first so that I know that all of the scallops are even.)

Step 2-


Sandwich your fabric and batting as in the picture above. The fabric should be right sides together and the batting should be on the wrong side of one of the pieces of flannel. Place the sandwich batting sided down.

Step 3-


Place your scalloped pattern on top of the fabric, pin, and trace with the fabric marker.

Step 4-


Remove the pattern, smooth out any wrinkles and pin all three layers together.

Step 5-


Sew along the marker line. Make sure to leave a gap to turn your blanket right side out.

Step 6-


Trim around the scallops. Clip the inside corners.

Step 7-


Turn right side out. Be careful not to rip your stitches near the opening.

Step 8-


Iron the edges of the blanket flat. Pin the opening closed.

Step 9-


Top stitch all the way around the blanket.

Step 10-


Hand stitch the edge of the opening.

Sunday, August 28, 2011

Back to School Treats

I made these little cookie jars for my kids' teachers on the first day of school. (PJ says its called sucking up, I just think its being nice.)


First bake some sugar cookies in the shape of apples. Any recipe will work, I used one with lots of butter. The cookie cutter is from Wilton, which I bought years ago from Walmart


Next, make up some royal icing. I use this recipe here, which uses meringue powder. Make a thicker royal icing and outline the apple in red.


Add a little water to the red icing and flood the cookie.


Using icing a little thicker than flood consistency, make your stems in brown, and leaves in green.


To make the these tags, download the printable at the bottom of this post, and print out. I sized the tags to fit a Stampin Up! 1 3/8" round punch and then I used the scalloped punch to mat it in red.

Back to School Printable

Saturday, February 13, 2010

2010 Album

These are the first 4 pages of my album for the year. It took me awhile to decide how I wanted to go about doing this. I wanted to try the picture of the day thing again this year, but it wasn't happening. I am lucky to have at least one picture a week, so my layout this year is flexible.

Week One:
Week 2:
Week 3:
Week 4:
I hope to get caught up this weekend, and then I can post one every week. (In theory at least.) Tell me what you think!!!

Tuesday, February 9, 2010

Backpack Backpack!

I have started my quest to create my very first pattern. So far so good. I chose this cute ladybug fabric for my little girly backpack. (Oh me oh my, who could I possibly give a girly little backpack to? Hint: It rhymes with Silly.)
I decided how big I wanted to make it and measured out pattern pieces from paper, and cut them out.

I decided this little girly backpack should be lined in red. I sandwiched the zipper between the ladybug fabric and the red lining. and sewed.
Then, I added some red piping on the ends of the zipper. This is the top and sides of the backpack. Can you picture it?
This is the reverse side.
I have just started pinning the piping onto the front of the backpack. This is probably as far as I will get tonight.
I'm trying to figure out how to hide my lining seams since I have already started sewing the lining in. I may not be able to. Just one of the many design flaws I am bound to come across during this process. Wish me luck!

Saturday, February 6, 2010

February Card Exchange

I finished my cards today for my little card club exchange. I used these cute little tree stamps from Stampin' Up! that I have had in my stamp drawer for months.
I decided to put some white card stock on the inside so that it would be easier to write on.
I am working on creating a pattern for a little kid backpack. I have all my pattern pieces cut out, I'm just not sure that they will fit together until I actually try to sew it. I'll post pictures of my progress........unless it is too big of a disaster. Then we will have to forget I mentioned anything about it. Toot-a-loo!

Tuesday, January 19, 2010

Projects from last week.........

I made this tote bag for MYSELF. I am keeping it. No you can't have it. I have been saving this fabric for 2 years and I finally got the courage to cut into it, so I am keeping it.

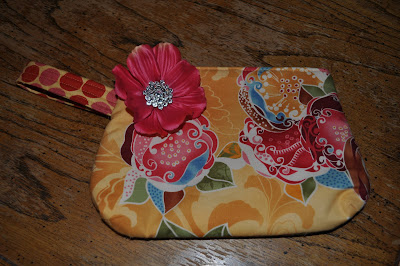
This cute little clutch/wristlet I made for my dear, dear sister for her 30th birthday. Happy Birthday Alyssa! (More on that below, heh, heh.)
This is Alyssa dancing with some random strange man at the piano bar. She pointed to him from across the room and commanded him to dance with her. He was happy to oblige as you can see.
She later went on to tie for first place in a "bootie shaking" contest. You go girl!

Monday, January 4, 2010

Some Craftiness

The latest card club selection...........

My favorite little handbag. (Notice it matches my apron. I try not to wear them together:)